CUSTOMIZATION +
CATALOG+
PURCHASES+
CONTENT+
CUSTOMER SERVICE+
PROMOTIONS+
CONFIGURATION+
ACCOUNTS+
PAGES
Page Types
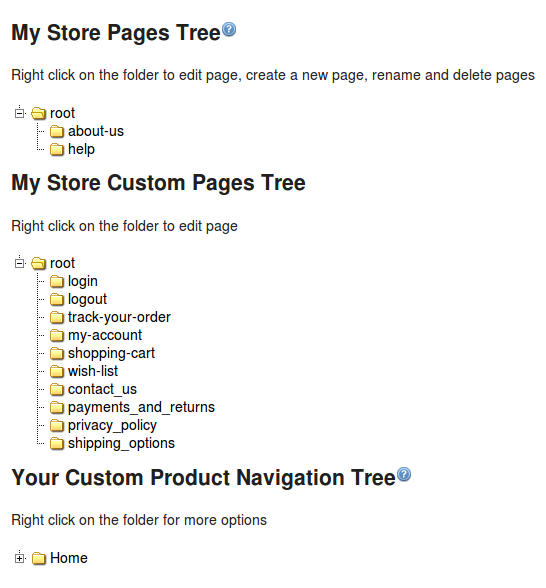
As a webstore owner, you have the privilege to customize the navigation structure on your webstore home page. There are two kinds of tree structure present on your webstore:
- My Store Pages tree: The My Page Tree contains other pages of your webstore such as About us & Help. Right clicking on the nodes enables you to edit, create, rename or delete the nodes.
- My Store Custom Pages Tree: This page tree contains pages such as login, logout, track-your-order, my-account, etc. You can edit, create, rename or delete the pages by right clicking on the particular nodes.
- Your Custom Product Navigation tree: The Product Navigation tree contains pages of browse nodes present in your catalog. This tree is created automatically by the platform. The nodes are derived from the browse nodes specified in your catalog. If you have chosen Infibeam navigation style the product navigation tree shows the Infibeam browse node structure. It contains all nodes which have your own products or Infibeam products chosen by you for selling on your store.
Customizing your store Navigation through Page Tree:
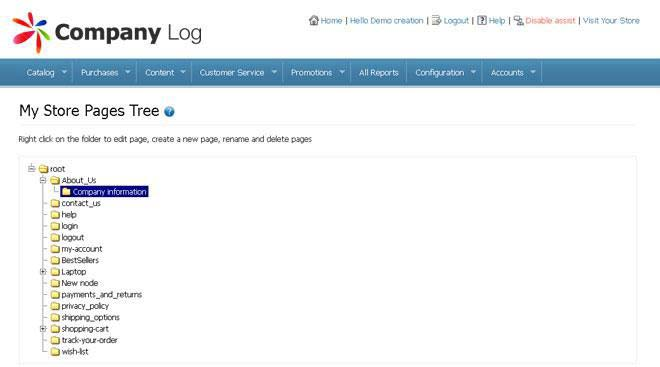
The procedure to modify the page navigation of your webstore is explained below. You can create, edit, rename or delete a child node on your page tree. You can create any number of child nodes for a particular node. For example, to create a node called ‘Company Information’ under the ‘About Us’ Node:
- In the Admin Panel page, click Content > Pages. The Pages screen is displayed.

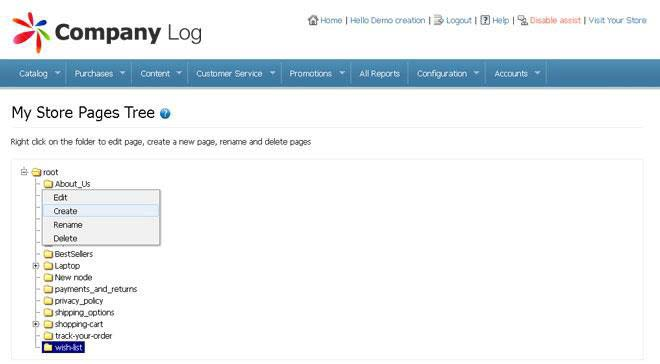
- Right click, “About Us” under which you want to create a child node. Four options — Edit, Create, Rename and Delete appear.

- Click Create. A new child node, ‘New Node’ appears.
To delete a child node:
- In the My Page Tree – Child Node, right click on the appropriate folder under which you want to delete a child node. Four options — Edit, Create, Rename and Delete appear.
- Click Delete. The child node is deleted from the webstore.
To rename the new child node:
- In the My Page Tree – Create page, right click on the new child node. Four options — Edit, Create,Rename and Delete appear.
- Click Rename. The name of the child node (New Node) is highlighted.
- Change the name as Company Information.
To add content under Company Information:

- In the My Page Tree – Child Node, right click Company Information. Four options — Edit, Create,Rename and Delete appear.
- Click Edit. The webstore home page opens.

- Log in to the administrator mode and use the Html widget to create content for the ‘Company Information page.
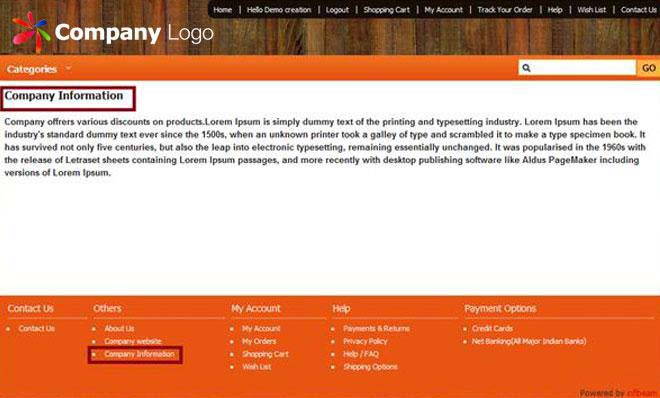
- Add the link to the Company Information child node in the footer section of the webstore home page.
The web page reloads and the new link that is created is visible in the footer section of the webstore home page.


